Mastering 3-Way Switch Wiring: The Ultimate DIY Guide

Three-way switch wiring allows you to control a light or set of lights from two different locations. This setup is common in staircases, hallways, and large rooms with multiple entrances. Unlike a standard single-pole switch, which has only two terminals, a 3-way switch has three terminals: one common terminal and two traveler terminals.
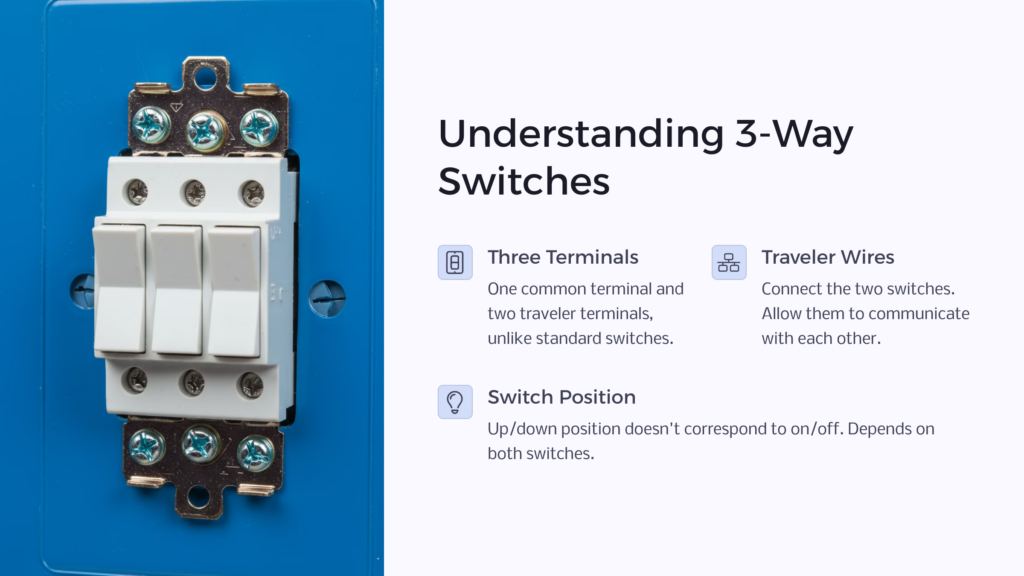
The key to understanding 3-way switch wiring is grasping the concept of travelers. These are the wires that connect the two switches and allow them to communicate with each other. When one switch is flipped, it changes the path of electricity through the travelers, turning the light on or off.
In a typical 3-way switch setup, you’ll have a hot wire coming from the power source, two traveler wires between the switches, and a wire leading to the light fixture. The arrangement of these wires determines how the switches control the light. It’s important to note that the position of the switches (up or down) doesn’t necessarily correspond to the light being on or off – it depends on the position of both switches.
Tools and Materials You’ll Need
Before you start your 3-way switch wiring project, gather the following tools and materials:
- Wire strippers
- Needle-nose pliers
- Flathead and Phillips screwdrivers
- Electrical tape
- Voltage tester
- Two 3-way switches
- Wire nuts
- Electrical box (if needed)
- 14/3 or 12/3 electrical cable (depending on your circuit)
- Cable clamps
It’s crucial to have the right tools on hand to ensure a safe and efficient installation process. The wire strippers and pliers will help you prepare the wires, while the screwdrivers are necessary for mounting the switches. A voltage tester is essential for safety, allowing you to check if wires are live before handling them.
The type of electrical cable you need (14/3 or 12/3) depends on the amperage of your circuit. For most residential lighting circuits, 14/3 cable is sufficient. However, if you’re unsure, consult an electrician or check your local building codes.
Step-by-Step Guide to Wiring a 3-Way Switch
Follow these steps to wire a 3-way switch:
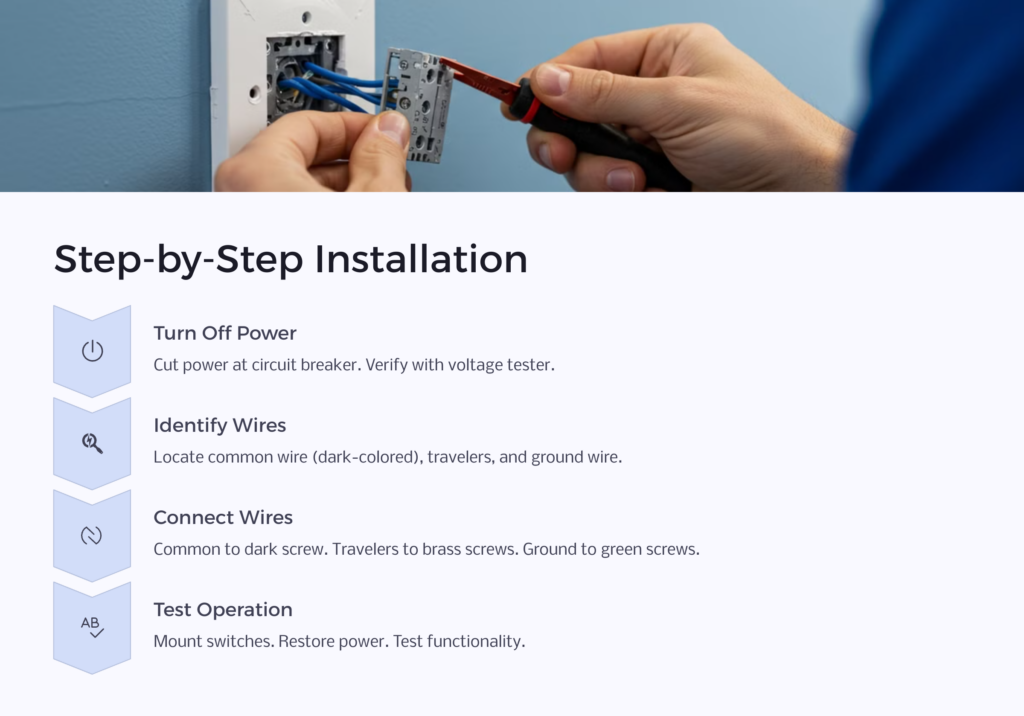
- Turn off the power at the circuit breaker and verify with a voltage tester.
- Remove the old switches and identify the wires:
- Common wire (usually dark-colored)
- Two traveler wires
- Ground wire (bare copper or green)
- Connect the common wire to the dark screw on one switch.
- Connect the traveler wires to the brass screws on both switches.
- Connect the ground wires to the green screws on both switches.
- Mount the switches in their boxes and attach the cover plates.
- Turn the power back on and test the switches.
When connecting wires, always use wire nuts to secure the connections. Twist the wire ends together before screwing on the wire nut. For a more secure connection, wrap the joined wires with electrical tape.
Remember, the exact wiring configuration may vary depending on whether power enters at the light fixture or at one of the switch boxes. Always consult a wiring diagram that matches your specific setup.
Common Wiring Diagrams Explained
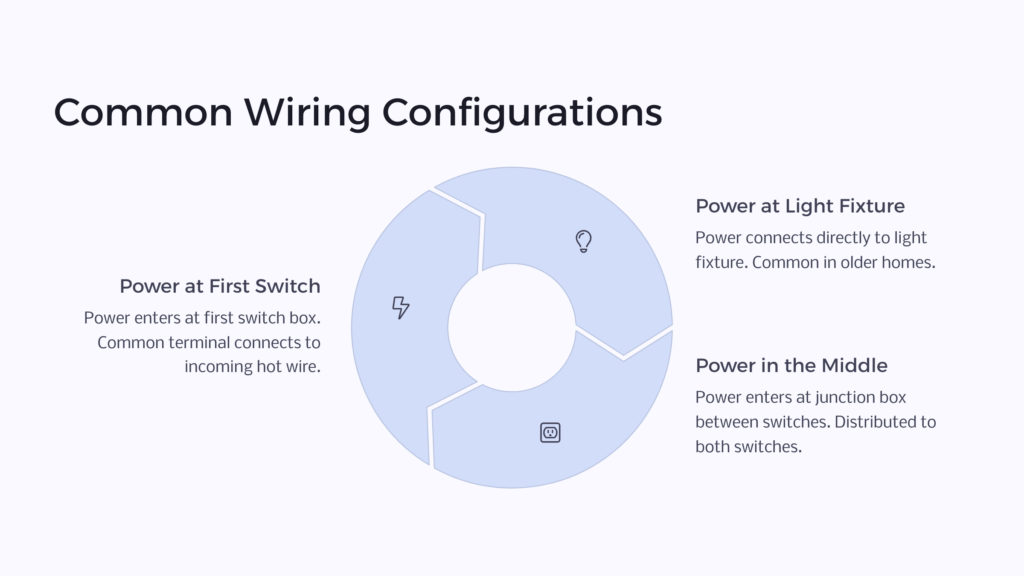
There are several common 3-way switch wiring diagrams you might encounter:
- Power at the First Switch: In this setup, the power source enters at the first switch box. The common terminal of this switch connects to the incoming hot wire. The travelers run between the two switches, and the common terminal of the second switch connects to the light fixture.
- Power at the Light Fixture: Here, the power source connects directly to the light fixture. A switch leg runs from the fixture to one switch, and travelers connect the two switches. This configuration is often found in older homes.
- Power in the Middle: Sometimes, the power source enters at a junction box between the two switches. From there, it’s distributed to both switches and the light fixture.
Understanding these diagrams is crucial for troubleshooting and installing 3-way switches. Always match your wiring to the appropriate diagram to ensure a safe and functional setup. If you’re unsure which diagram applies to your situation, it’s best to consult a professional electrician.
Troubleshooting Common Issues
Even with careful installation, you might encounter some issues with your 3-way switch wiring. Here are some common problems and their solutions:
Light doesn’t turn on:
- Check if the bulb is burned out
- Ensure all connections are tight and secure
- Verify that the power is on at the circuit breaker
Switches don’t work correctly:
- Double-check that the traveler wires are connected to the correct terminals
- Make sure the common wire is connected to the dark screw on each switch
Light stays on all the time:
- This often indicates a miswired switch. Recheck your connections against the wiring diagram
One switch works, but the other doesn’t:
- This often indicates a miswired switch. Recheck your connections against the wiring diagram
If you’ve tried these troubleshooting steps and still can’t resolve the issue, it’s time to call a professional electrician. Electrical work can be dangerous if not done correctly, so don’t hesitate to seek expert help.
Safety Precautions
Safety should always be your top priority when working with electrical wiring. Follow these essential precautions:
- Always turn off the power at the circuit breaker before starting work.
- Use a voltage tester to confirm that the wires are not live.
- Wear insulated gloves and avoid standing on a wet surface.
- Never work on aluminum wiring without proper training.
- Ensure all connections are secure and properly insulated.
- Follow local electrical codes and obtain necessary permits.
Remember, if you’re ever unsure about any aspect of the wiring process, it’s better to consult a licensed electrician. The cost of professional help is small compared to the potential risks of improper wiring.
Advanced Wiring Techniques
For more complex setups, you might need to use advanced wiring techniques. Here are a few scenarios:
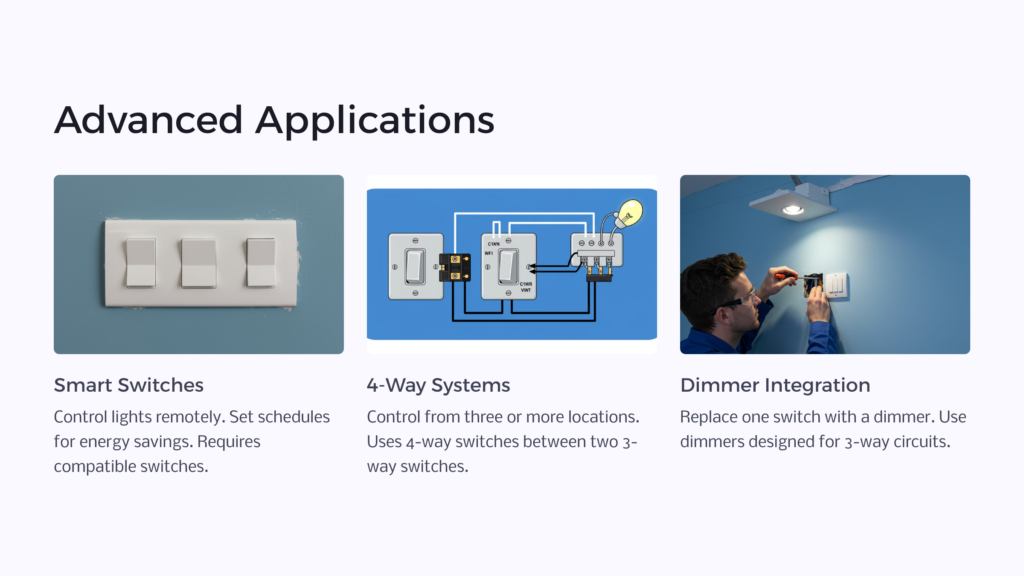
- 4-Way Switch Installation: This allows you to control a light from three or more locations. It involves adding 4-way switches between two 3-way switches.
- Dimmer Switch Integration: You can replace one of the 3-way switches with a dimmer switch for more lighting control. Make sure to use a dimmer specifically designed for 3-way circuits.
- Multiple Light Fixtures: When wiring multiple lights to a 3-way switch setup, you’ll need to carefully plan the wiring to ensure all fixtures are controlled by both switches.
These advanced techniques require a deeper understanding of electrical systems. If you’re not comfortable with these setups, it’s best to hire a professional electrician to ensure safe and correct installation.
How to Install a 3-Way Smart Switch
Smart switches offer convenience and energy savings by allowing you to control your lights remotely or set schedules. Here’s how to install a 3-way smart switch:
- Choose a compatible smart switch. Some require a neutral wire, while others don’t.
- Turn off the power and remove the old switch.
- Identify and label the wires in your switch box.
- Connect the wires to the smart switch according to the manufacturer’s instructions.
- Install the companion switch at the other location if required.
- Mount the switches and restore power.
- Follow the manufacturer’s instructions to set up the smart switch with your home automation system.
Remember that not all smart switches are compatible with every 3-way setup. Always check the product specifications and your existing wiring before purchasing a smart switch.
When to Call a Professional
While many homeowners can successfully wire a 3-way switch, there are times when it’s best to call a professional:
- If you’re not comfortable working with electricity
- When dealing with aluminum wiring
- If your home’s wiring is old or doesn’t meet current codes
- For complex setups involving multiple switches or fixtures
- If you encounter any unexpected issues during installation
A professional electrician can ensure your wiring is safe, up to code, and functioning correctly. They can also help you troubleshoot any persistent issues with your 3-way switch setup.
Frequently Asked Questions about 3-Way Switch Wiring
Q: Can I use a regular switch in a 3-way setup?
A: No, you need specific 3-way switches that have three terminals.
Q: How do I know if I have the right wires for a 3-way switch?
A: You should have a common wire, two traveler wires, and a ground wire.
Q: Can I install a 3-way switch if I only have two wires in my switch box?
A: No, you need at least three wires (plus ground) for a 3-way switch setup.
Q: Why does my light turn on when both switches are down?
A: The position of the switches doesn’t matter in a 3-way setup. It’s the combination of both switch positions that controls the light.
Q: Can I use a 3-way dimmer switch with LED bulbs?
A: Yes, but make sure to choose a dimmer switch that’s compatible with LED bulbs.
Remember, if you’re ever unsure about any aspect of 3-way switch wiring, it’s always best to consult with a licensed electrician. They can provide expert advice and ensure your wiring is safe and up to code.